Built-In Storage
One of the challenges and concerns of this project has been the incorporation of storage into the space. This has been further complicated by our desire to accommodate the nine sleeping spaces, with the space required for the beds competing with space available for storage. I have this conversation with clients often, especially those who are seeking to live in a smaller space: what do you need to store? As I write this I think about the reactions of friends to something we as a family did a couple of times several years ago.
We called it a power fast, really the “p” should be capitalized, more like this: Power fast. Not an aggressive starvation, rather turning the electricity off to our house for a week and seeing how it went. It was a great experience, clarifying and thought-provoking that I won’t get into here, but almost as interesting was the reaction of people we knew. Some folks would be really confused about what we meant about turning the power “off”, unable to imagine such a thing, on the other side would be those that would tell of their experience living in a cabin without electricity for 8 years and getting their water from a dip well.
The storage of stuff generates the same sort of divide, some can’t imagine making do without the basement and attic to fill with boxes, others can pack most of their stuff into a backpack or at most a compact car and don’t know what the big deal is. We’ve had the basement and a large house of stuff and so no matter what this move required a paring, in fact so far it has been two parings to get down to what we are going to have in the new space, but we had to ask ourselves the same question “what are we going to store?”
Beyond the basic stuff that we will come back to, in making our decisions about what was coming with us we settled on love as the defining criterium. It would come with us if we loved it; handmade chairs from a chairmaker in North Carolina, furniture that I had made, a couple of other furniture pieces that we had a place for and held nostalgic value (this is a slippery slope), handmade pottery from potters that we know, other art, some made by Mary or I, most from others, again people we know, books, not a ton but several shelves worth, cookbooks, important in our house. The furniture obviously we have a place for on the floor, the art likewise on the walls, for the books and pottery though we would need to build a place. There’s camping stuff and sewing stuff, files and plans for the business, canning jars and I am sure other things that I can’t remember even if I did put everything in a pod when we moved out a couple of weeks ago (but not in yet, lease was up). There had to be a place made for those things and hopefully for the things I can’t remember right now too.

Understandably the storage in the office will mostly be the home of office stuff. Under and to the left of the bed are file drawers. The spaces above the drawers and on the top shelf above the bed will be open storage for paper and other supplies. On the left wall there are two openings, the nearer, a book shelf, likely to hold code books and other construction reference. the further is an opening to access the area under the entry landing. This is a pretty big space, 50 cubic feet or more, camping equipment?

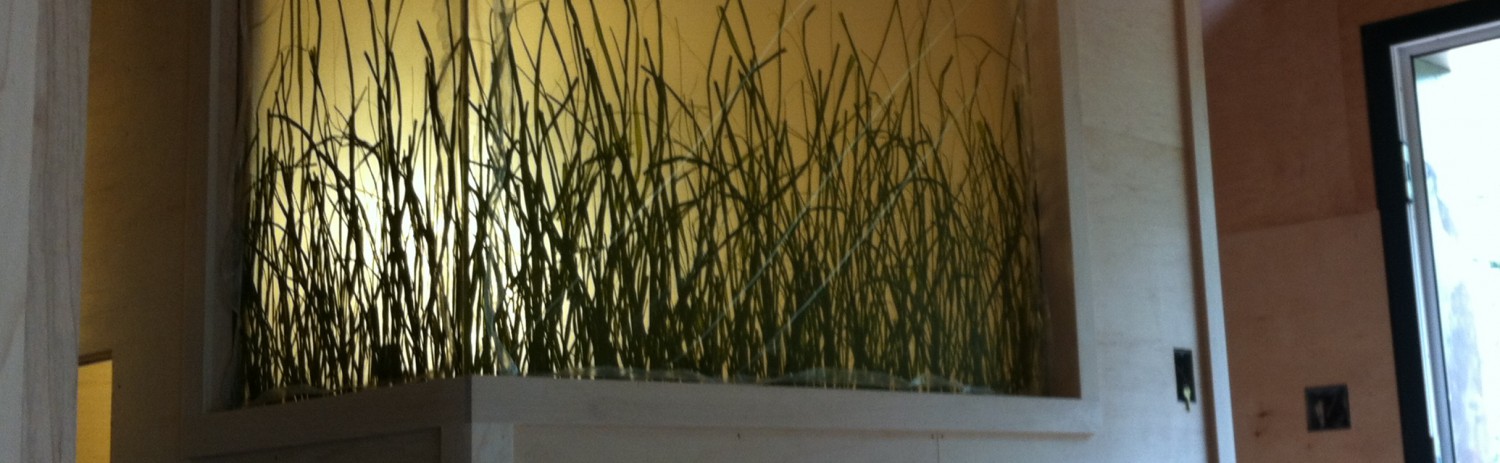
If you are counting sleeping spots the murphy bed in the living room is number five and six. And in order to both create privacy for guests and expand the available storage we decided to completely cover the wall bed with a sliding cabinet. This cabinet would go from floor to ceiling and when stowed against the wall nest around the bed. The area in front of the murphy bed would be shallower bookshelves while the area around the perimeter would be two foot deep cabinets with both drawers and doors. When pulled fully away from the bed the cabinet would provide a third wall, a curtain extended between the house wall and the cabinet completes a very small and somewhat private guest bedroom.

The planning for this assembly started very early. When framing, we placed the beams in the ceiling that would eventually carry the tracks for the sliding mechanism. The cabinet is entirely hung from above with no support or guides at the floor. I have seen several examples of similarly operating cabinets online, but there was never any detailed information about the hardware that was used. After looking at a couple possibilities I settled on heavy-duty sliding door hardware, and I mean heavy-duty, think pocket doors that weigh a thousand pounds. I initially pursued using Hettich (sold under the brand name Grant) but after a back and forth with their engineers they felt their hardware wouldn’t work. My second choice was PC Henderson. With them I didn’t have to convince anyone that their product would work for my purposes, I just bought what I figured I needed, in this case the track rated for 1500 lbs. or actually two tracks, and four rollers. This isn’t even the strongest track they sell, there is one rated for 4500 lbs. I was working off the idea that the cabinet would weigh around 500 lbs and the stuff in the cabinet would weigh about the same, so somewhere in the vicinity of 1000 pounds total. Divided between the two tracks it puts 500 pounds of load on each track, 250 pounds on each set of rollers. This is well within the load rating of the hardware, but since the load is concentrated at two points 20 inches or so apart instead of distributed across a 4 foot wide door, we made sure to attach the track to the framing in the ceiling frequently, every 8 inches with a 3/8 x 5 inch quick drive lag screw. Each side of the cabinet then is directly supported by 3 screws (discounting the rigidity of the track itself) putting the load on each screw at about 170 lbs. The beams in the ceiling are 11 7/8″ LVL in a ceiling composed of 16″ I joists. The LVL’s are flush to the top of the ceiling joists leaving them 4″ above the bottom of the joists allowing space for the track to recess fully within the ceiling. We left a 1″ slot in the ceiling plywood to allow for the sliding of the connecting hardware, in this case the rollers that we used had 5/8″ threaded rod for the connection. You can probably see the connecting nut in the top of the sliding cabinet in the picture below.
I wanted the cabinet to fill the whole space between the floor and ceiling, no baseboard or crown detail, but since the threaded rods from the rollers hang down below the ceiling about 5″ that meant we had to assemble the components in place. We started by hanging the top bank (which you can see in the photo above) and attached the pieces below one by one. When finished this allowed for a gap at the ceiling of a little less than 1/2″ and at the floor about 3/4″. The disadvantage to this approach is that to remove the cabinet it will have to be cut apart.


None of the photos show the cabinet at completion (we’re still making doors and drawers), but this outlines the process we used to build the thing.
Here is a quick video of the sliding cabinet in action:
Then there is the basic stuff. Clothes: we will need a closet. Broom and vacuum, other cleaning things, toilet paper, towels, bedding, pots and pans, ironing board, iron.

The kitchen is divided between three separate units, the cabinets on the wall, also home to the fridge, dishwasher and oven. The dishwasher is a 18″ unit and the oven is a 24″ wall unit placed below the counter with a drawer underneath. The island is the second component. It houses the sink and has generous prep space. And last the tall kitchen storage, a ten foot tall, twelve-inch deep cabinet divided between a lower section behind doors and an upper section of open shelves. The tall cabinet will also store/display the handmade plates. There are 8 plate shelves on each side of the cabinet that will allow the plates to be stored in the open. You can see them going ladder-like up the side of the cabinet in the photo above. I didn’t mention a dedicated cooktop surface because there isn’t one. The stove top cooking will take place on portable and stowable induction hot plates. There are good reasons for this, there is no gas in the house so we were going to be cooking on an electric surface one way or another, the limited counter space would have become even more limited with a permanent cooking surface incorporated into the kitchen, being able to use the same surface to prep and then cook makes the small space more versatile. Even so it was hard to embrace the idea when we had always, since we had a choice, cooked on gas.
So we bought a Volrath single eye induction hot plate about 9 months ago to try before we got too far along on the kitchen rough in. It took some getting used to, like any new tool, but it has been called a success by the person in the house that does the majority of the cooking. I won’t go into all the advantages of induction cookery, but I will share this one that is germane to the purpose of the project: it is something like 70% more efficient than other stove top methods.

So on to the clothes. Downstairs between the bedroom and the office sits “the closet that holds everything” This would be a 105″ long, 28″ deep space that is our clothes closet, washer and dryer, ironing board, vacuum and broom storage, and some high spaces that will have something in them that we will learn about later. The photo above shows the left side of this space, the tall narrow space on the far left, nearly hidden by Paul, is the broom and vacuum space. The large spaces to his right are for the stacking washer/dryer, between the washer space and dryer space is a narrow slot that will house a pull-out fold-out ironing board. And to the right of that is the clothes closet, all 70″ of it. All of this will be behind doors when finished. For the observant you may have noticed there isn’t a dryer vent in the dryer space. The dryer we are using is ventless, it condenses the moisture from the exhaust air and drains it down the washing machine waste line. Additionally the dryer is heated by a heat pump, a relatively new use for heat pumps in the US, that only requires about a third of the energy to dry a load of clothes. We actually don’t use a dryer often, preferring to hang the clothes outside to dry. The most efficient method of all.
Three more quick mentions of spaces where we took advantage of storage opportunities. The bed has drawers that pull out from the sides to store linens.

And the upstairs bays both have window seats that have cabinets underneath.


Enough about storage.
A quick pictorial of the solar installation


The panels are at an angle to the support because the house in oriented on a southeast/northwest axis. Even so the panels are not facing due south, more like 20 degrees to the southwest. If we had angled them more and gotten them facing due south we would have run out of room on the support for the solar water collectors. the panels are Solar World 280w with enphase microinverters. Permanent power is scheduled to be turned on next Monday and at that point the panels will start to generate.
One last photo…


Great entry! For some reason this reminds me of a quote attributed to Mark Twain and others: “I’m sorry for such a long letter. I didn’t have time to write a short one.” I love how this project is not just about a new living space but has really forced you all to think about what is important — what is means for a house to offer “graciousness of living”, how to minimize energy consumption, how to fit your wants and needs into a confined space, and what things you love and want to keep. We’ve enjoyed watching from a distance and can’t wait to see the finished product.
LikeLike